Topic Menu
MiFILE is Michigan's statewide electronic filing (e-filing) system. Not all courts use MiFILE. You can find out if your court uses MiFILE by looking at the list of E-Filing Courts in Michigan. For general information about MiFILE and e-filing, read What is E-Filing?.
Some courts accept filings by e-mail. This article does not cover the process of e-mail filing. This article only covers how to start a new case if your court is using MiFILE.
If there is already a case started in MiFILE and you need to file documents to that existing case, read How to File Documents in an Existing Case in MiFILE (coming soon).
These instructions are for all courts using MiFILE except for the following courts:
- 3rd Circuit (Wayne County)
- 6th Circuit (Oakland County)
- 13th Circuit (Antrim, Grand Traverse, and Leelanau Counties)
- 16th Circuit (Macomb County)
- 20th Circuit (Ottawa County)
If you are filing in any of the courts listed above, check with those courts to get their e-filing instructions. Here are some important things to know before you get started with e-filing:
- You will need to know the names and contact information for all parties involved in the case.
- Each document must be saved as a separate file. For example, if you are starting a case, you may need to upload a complaint and a motion. These cannot be combined as one file. You must upload the complaint as one file and the motion as another file. If you upload multiple forms as one file, your case will be rejected. If you have documents saved together as larger bundles and want help creating separate documents, read Working with PDF Files.
- Make sure your documents are in one of the accepted file types. PDF and Word documents are both acceptable. To see a full list of accepted file types and other information, read How to Prepare Documents for E-Filing.
Video Instructions
The State Court Administrative Office (SCAO) has developed video guides to show you how to start a new case. The following videos will help you through the steps of filing a new case:
- How to Initiate a New Case
- How to Upload Filings to a Case
- How to Submit Payment
- How to Request a Fee Waiver
Written Instructions
These instructions will tell you how to start a case, upload documents, submit a payment, and request a fee waiver.
-
Go to MiFILE and log in to your account. If you do not have a MiFILE account and want help creating one, read How to Register for MiFILE.
-
Click File in the navigation pane on the left side of the screen. On some smaller screens, this navigation pane may appear at the top.

-
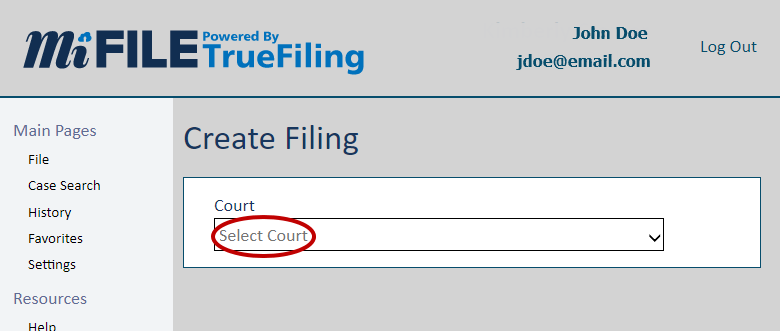
This will open a Create Filing page in MiFILE. Use the Court drop-down menu to choose the court where you want to file. If you filled out your forms using a Michigan Legal Help DIY tool, the court where you will file will be listed at the top of the document in the caption. The court is usually listed in the upper left corner.
-
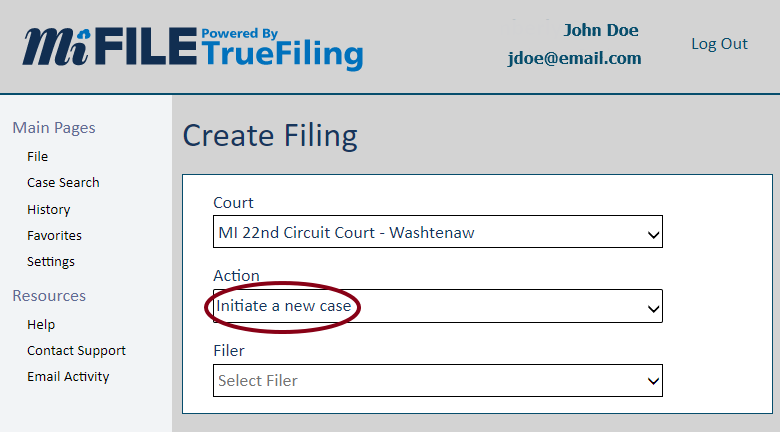
Use the Action drop-down menu to select “Initiate a new case."
-
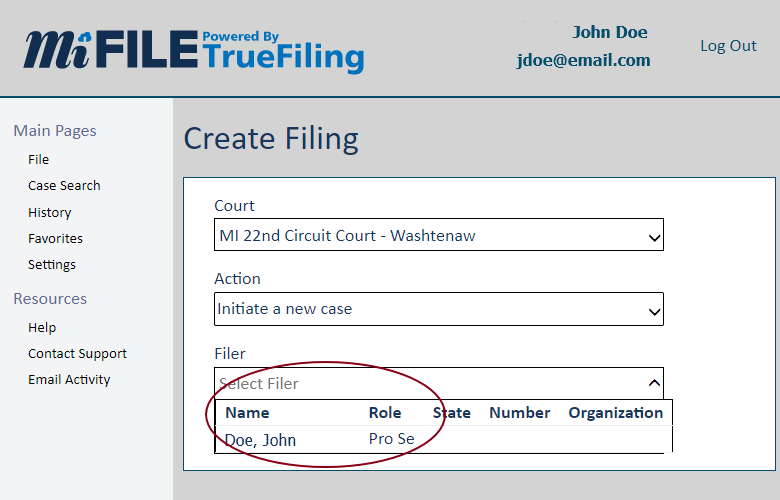
Use the Filer drop-down menu to select your name. Most self-represented people will only see themselves listed here. If you have any MiFILE connections, they will also be listed here. If you are helping someone else file and you have been connected to the filer through notification settings, you will see your name listed. If you are in this situation, choose the name of the person you are helping, not yours.
-
Use the Case Category drop-down menu to select the two-letter case-type code for your case. If you used a Michigan Legal Help DIY tool to create your forms, the Checklist for your forms will have information about the case-type code. If you need help finding this information, you can use our LiveHelp service. The article How to Find a Case-Type Code has more information as well as a list of some of the most common case-type codes.
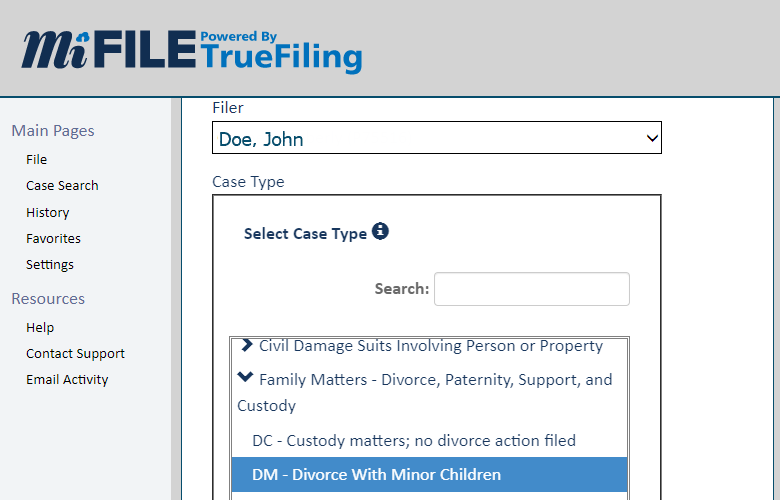
If you do not see the case-type code you need, confirm that your court is accepting your case type on MiFILE. Even if your court has e-filing available, they might not offer it for your particular case type yet. Check SCAO’s list of E-Filing Courts in Michigan for this information.
Click Next below the case category selection to continue to the next step.
-
Next, you will see a Party Details screen. Fill in the information for each party in the case. There is an Add Party button at the bottom of the Party Details screen that you can use if you need to add more parties.
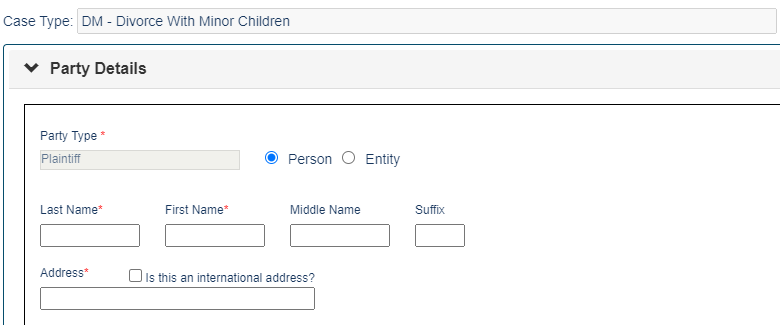
The parties in this section will be listed by legal labels. The party labels that are listed in your case depend on what type of case it is. The most common parties are plaintiff and defendant. The plaintiff is the party who files the case and the defendant is the party on the other side. Some cases use petitioner and respondent. In these cases, the petitioner is the party who files the case and the respondent is the party on the other side. Finally, some cases will have a petitioner and subject of petition. The petitioner is the party who files the case. The subject of the petition is the person the case is about– for example, in a case to probate a will, the subject of the petition would be the person who died.
-
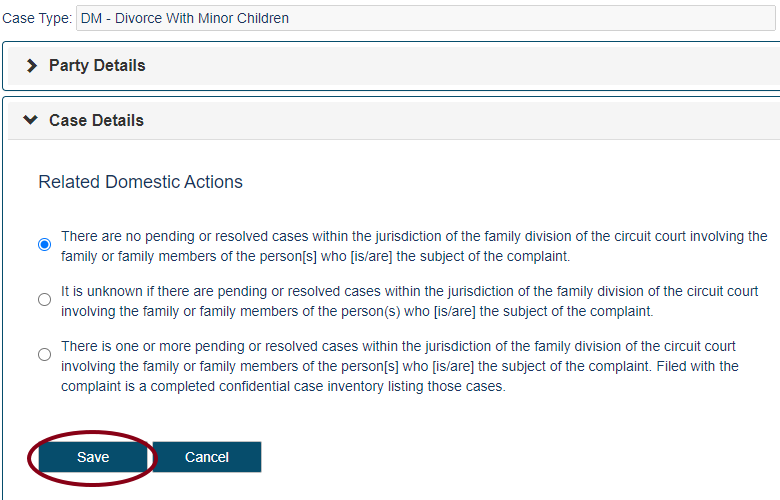
Some case types require additional case details. Scroll down past the Party Details. If you see the Case Details option listed, you must fill it out. Click the arrow next to Case Details to open the fields and fill them out.

-
After you have filled in the party information and the case details (if needed), click Save. The exact language on the case details option depends on the kind of case you are filing. Your screen may not have the options listed in the picture below.
-
Next, you will get to the file upload screen. Here you will upload each document that needs to be filed. You will see that one document has been automatically created and uploaded for you: the Case Initiation Form. MiFILE uses the information entered on earlier screens to create this form. You can use the View and Edit buttons to make sure all of the information is correct.
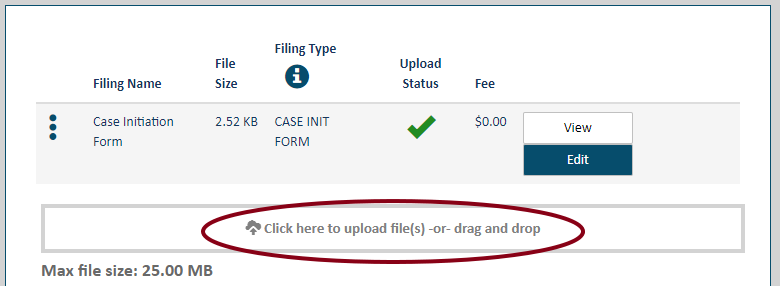
You can either click and drag your documents into the upload box, or you can click the box to open a file explorer and choose documents from your computer to upload. Make sure that each uploaded file only has one court document. For example, if you are starting a case, you may need to upload a complaint and an affidavit. These cannot be combined as one file. You must upload the complaint as one file and the affidavit as another file.
If you plan to ask for a fee waiver, do not upload it on this screen. You will upload the fee waiver later on the payment screen.
-
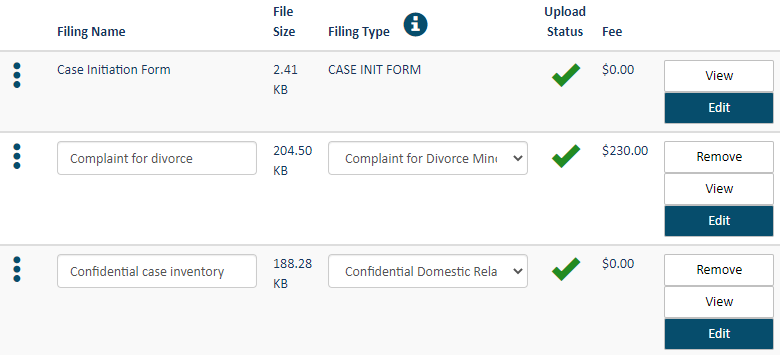
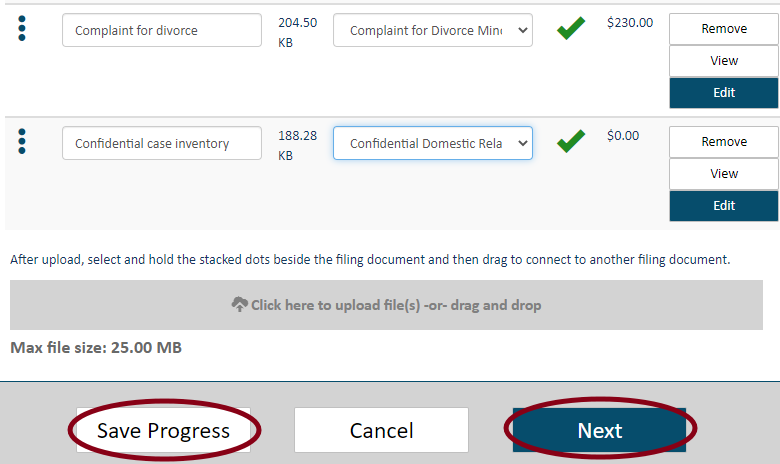
After uploading your documents, you will need to label each one with a “Filing Type.” The options will vary depending on the kind of case you are filing. Use the drop-down menu next to each document to choose the filing type that is the best fit. If none of the filing types fit your document, you can choose the “Other” option. The image below shows an example of two documents that have been uploaded with the appropriate filing types selected. Some filing types have a fee assigned. If you are planning to ask to have the fee waived, you will ask for a fee waiver at a later stage in this process. If you are not asking for a fee waiver, you will have to pay the filing fees shown.
-
If you click the Edit button that appears after your uploads, you will see options to mark documents as sealed or confidential. Most court documents are public record, meaning that anyone can come to the court and look at them. If you are filing a motion to seal one of the documents you are filing so no one can see that document, you can select the sealed option. The confidential option will not typically be used by a filer. If you choose one of these options but there is not a legal reason to seal or keep the filing confidential, the court will change the status and the document will be public record. If you have questions about this, contact your court.

-
If you need to stop working before you are ready to submit your documents to court, scroll to the bottom of the page and click Save Progress. If you do this, you can come back to MiFILE later and go to History to find your saved work under the Unsubmitted tab. After all your documents have been uploaded and you are ready to submit them to the court, click the Next button.
-
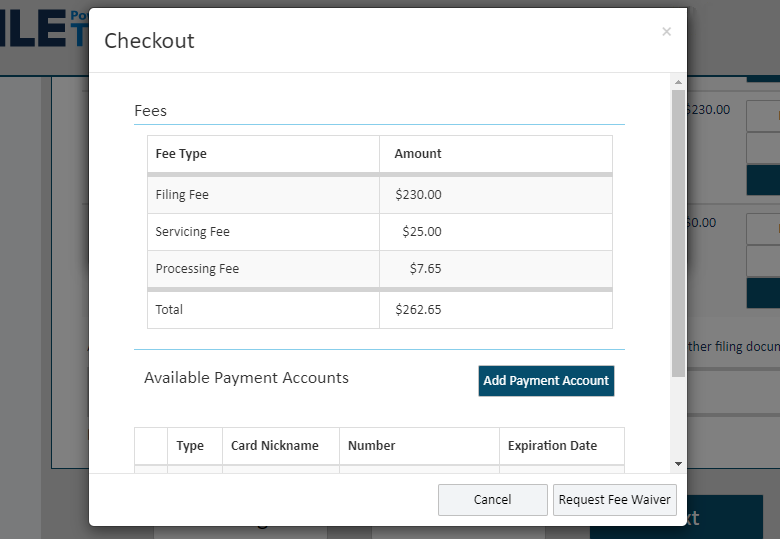
A checkout screen will appear. This screen will give you the option to pay your fees or ask for a fee waiver. If you ask for a fee waiver, you will be allowed to file your documents without paying any fees. If the court accepts the fee waiver, you can file documents for the rest of the case without paying fees. If the court denies the fee waiver, you will be notified that you must take action within 14 days or the court will reject your filing. For more information on this process, read Fee Waivers in Court Cases.
How to Pay with a Credit Card:
If you have already added your credit card information to your MiFILE account, your card will appear under Available Payment Accounts. Choose the card you would like to use and click Submit.
If you do not have a card saved in your MiFILE account, click the Add Payment Account button to add a credit card to use in MiFILE.
For more information, including what you can do if you do not have a credit card, read Paying Fees in E-Filed Cases.
How to Request a Fee Waiver:
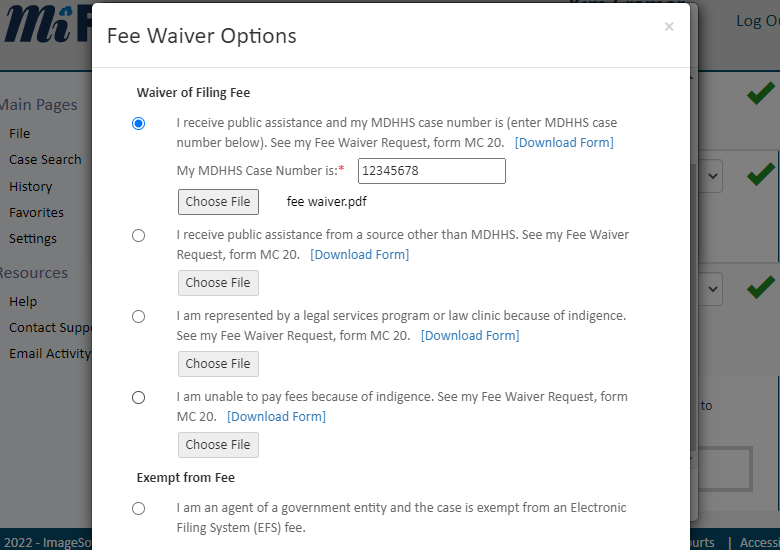
To ask for your filing fees to be waived, you will need a completed Fee Waiver Request form. If you do not have one, use the Do-It-Yourself Fee Waiver tool. In MiFILE, click the Request Fee Waiver button. A Fee Waiver Options screen will appear. Select the reason for your fee waiver, and then click Choose File. Upload a copy of your Fee Waiver Request form. Click Select at the bottom of the fee waiver options after your form is uploaded.
-
Whether you selected a card to pay with or uploaded a Fee Waiver Request, click Submit on the checkout screen after you have made your selections. Do not leave MiFILE until you see the “Submission Successful” screen. Your documents have not been submitted to the court until you see this confirmation.

-
After you submit the case through MiFILE, the court clerk will review your documents, including the Fee Waiver Request, if you submitted one.
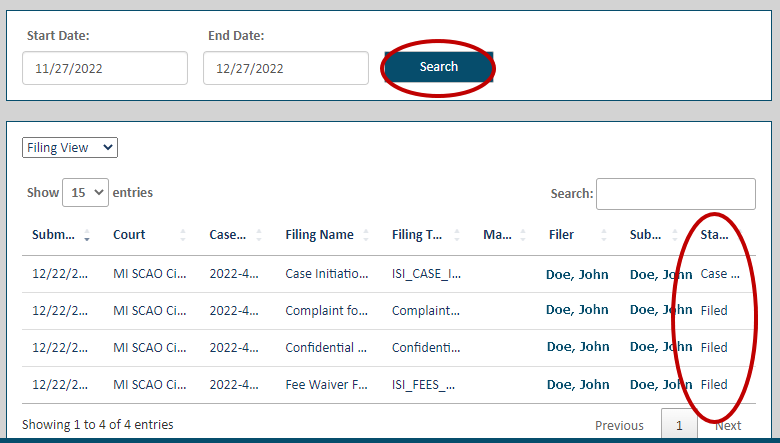
If your filing is accepted, you may receive an e-mail or a text message notification, depending on your notification settings in MiFILE. If you want to check the status of your submission, you can log back into MiFILE and click on History in the menu on the left side of the screen.
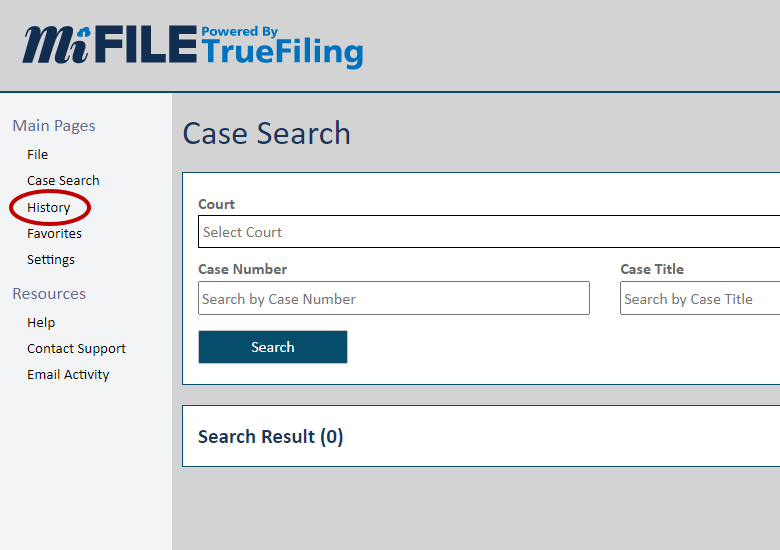
When you get to the History screen it will show a date range and a Search button. You must click Search to tell MiFILE to display your document history. The screen will be blank until you click Search. If your documents have been accepted by the court, it will say "Filed." The case initiation document status will say "Case Initiated."
If the clerk rejects your filing, read E-Filing Rejection Reasons and How to Fix Them.
If you submitted a request for a fee waiver and the judge denies it, read Fee Waivers in Court Cases to learn about what to do next. If your fee waiver is denied and you do nothing, your filing will be rejected. If you need to pay fees after your Fee Waiver Request was rejected, you cannot do this in MiFILE. You will need to go to the court in person to pay the filing fees.
-
E-filing documents to start a new case does not automatically serve or send notice to the other party. When you start a new case, you must have the other party served. This process will happen outside of MiFILE.
There are some exceptions to the requirement that the other party must be served. For example, if you are filing an ex parte Petition for Personal Protection Order, you do not need to serve the other party until after a personal protection order is issued by the court. To learn more about service, read How to Serve Court Documents (coming soon).
